
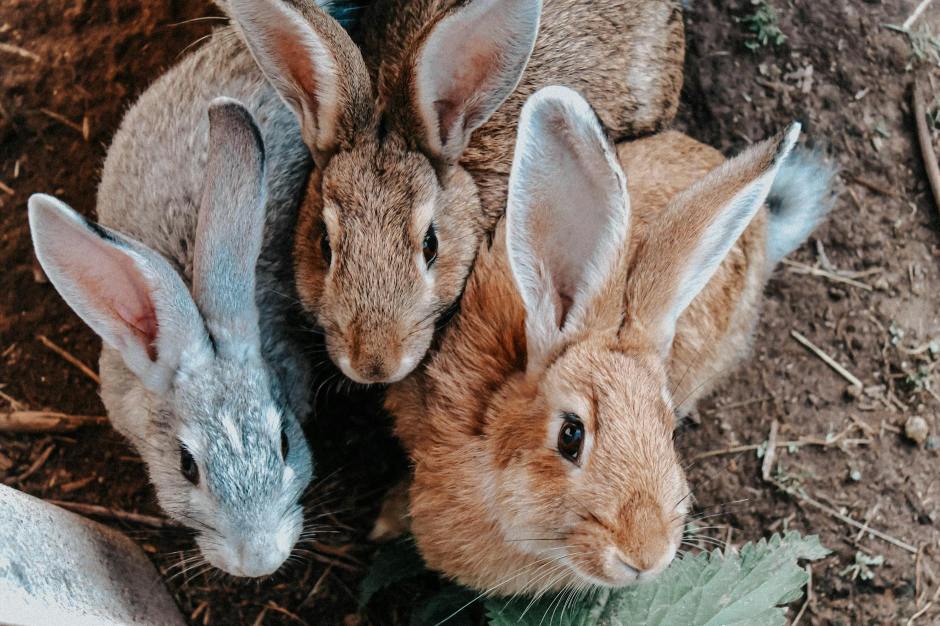
We added some rabbits to our little collection earlier this year, and then we added a couple more. This has been in the plans for a while and we are glad to finally have a start on this new adventure, but the pens are not ready yet so we have been improvising by using some dog crates for housing.
When we first moved to Florida, we brought our rabbits with us and they had been housed within the chicken pen. Here, in Florida, we had the cages in the coop which helped as the chickens kept pest pressure low for the chickens and they were able to clean up any food waste… WIN, WIN!
That is the setup we are going for, and recently we learned that this is called a ‘Racken House’ or pen. I believe this name was coined by Joel Salatin and this is the way they raise rabbits and chickens on their farm. They also use mobile rabbit tractors and such as well, we also plan to do this in the future.
We recently finished up our new poultry area and then we decided that would be the perfect place to house our first rabbits… we do plan to add some to the other chicken coop as well. We needed some pens to hold them though. We do have plans to build some actual rabbit hutches, but for now we will be using some larger cages to house them in a style similar to the video above.
I purchased the materials to make a few cages and Mr. Awesome assisted me in making them over the weekend. I will post the video below when I get it uploaded to YouTube.
These cages are oversized so that they can be multipurpose in the future. We also plan to use these larger cages for Mommas and babies, then we move Momma after weaning and use them for grow out cages, if needed. The whole purpose of keeping them in the chicken coop is so that we can stack uses and everyone can reap benefits from each other. In the future I plan to have the hutches set up to catch the rabbit waste for our worm bins as well… so many functions being stacked!
I would also like to try stacking the rabbits with quails underneath, and then the worms for a multifunction tower… but we will see!
This set up should also help cut down on smells as we will continue to use the ‘deep litter’ method that we are using in our coops. Once we have a thick layer of compost or a bin of worm castings ready then we will be using it for the garden. I could also use a bin directly under the cages to collect the manure for the garden as rabbit manure is considered to be a ‘cold’ manure and can be applied straight to the garden.
Cage instructions:
I will include the materials and instructions for the cages we made, but the cages can be customized to any size. You may also use whatever wire that you have on hand.
Basic Material List:
see below for links
- Baby saver wire (1/2 x 1) 14 ga is best but 16 will work
- Cage wire (1 x 2) 14 ga is best but 16 will work
- Harware cloth (optional)
- Cage clips and tool
- Tin snips
- Door latch
- Feeders
- Waterers
- Hay Rack: we made ours from some of the scrap wire
- Resting Mats: you can use a piece of tile or piece of wood
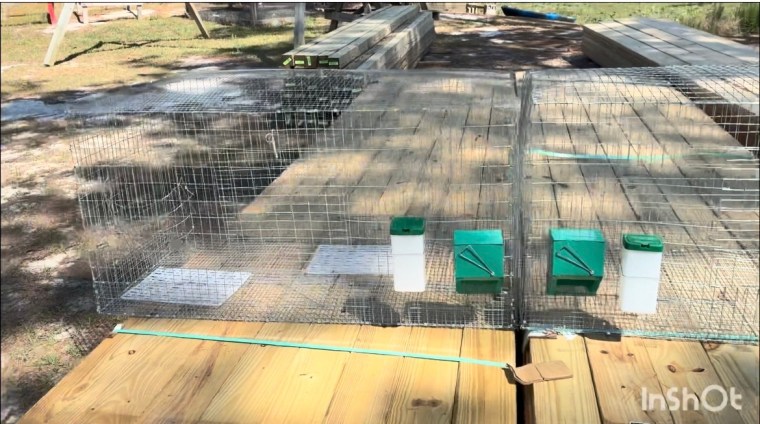
Cut List for 24 x 48 x 24 cage:
- Bottom: 24 x 48 Baby Saver Wire x 1
- Front/Back/Top: 24 x 48 Cage Wire x 3
- Sides: 24 x 24 Cage Wire x 2
- Door: 14 x 14 Cage Wire x 1
- Baby Saver Strip: 4 x 48 Baby Saver Wire x 3 Optional: this can be cut from hardware cloth as well.
We found it easiest to cut all the pieces first and then assemble. There is a great video HERE.
We started by laying the bottom on the work table, and then lining up one side. We attached the side to the bottom with J-clips and then went to the next side… only attaching them at the bottom. Work from one side to another so that you don’t have any bulges.
Then we attached the sides, one at a time, making sure to clip both sides of the wire with the J-clips. If you miss a wire just add another clip to secure it.
Once the sides and bottom were attached, we did the top, working from one corner to another.
After the top, we found it easiset to add the the baby saver strip to the bottom edges, before cutting out the door and the holes for the feeder.
We centered our door fon the front of the cage. Then we cut out a 12 inch by 12 inch square. We then attached the door at the bottom, but it could be attached on the side or top. Then we attached the latch to the cage so that it could secure the door tightly.
You will want to decide on placement of your feeders or waterers before cutting out the door. You may alos opt oto use feeders and waterers than can be placed in the pen rather than attached to it.
We then cut out the place for the feeder and attached the waterer, but you could just purchase a feeder or water bowl to put in the cage.
I used the scrap wire from cutting out the door to make a hay feeder, but you can buy some already made.
We added the mats and then set them out to wait for the supports to be made. Some people hang the cages but I don’t want to hang them from our cattle panl hoops.
After we get these put in place, we will build supports for the current cages and then add some of the baby saver wire to the bottom of those cages to make them a little safer. These will probably become the cages for the bucks or quarantine areas for new animals.
I will update this post as we make further progress, but for now I will just add the materials we used to construct these simple, but efficient cages. You can make them any size you want, but your materials may vary depending on your area.
God Bless!
**This post does contain some affiliate and/or referral links to products and/or services that we use. If you happen to click through a link and make a purchase, we may earn a teensy-weensy small commission (at NO EXTRA cost to you) if a purchase is made through these links. These links help to support our family, our blog, and our homeschooling mission. This means that we can keep bringing you great recipes, ideas, and tips for FREE! Click HERE for a full disclaimer. –Thank you!
Affiliate Li.nks:
Wire Cage Materials:
Note: 14 gauge wire is best but 16 gauge will work. I found some of my wire cheaper at the local TSC.
10 Pack Spring Cage Latch Door Spring Hook
2Pack Rabbit Water Bottle for Cage, 32oz
15 Pack Woven Bed Mat for Rabbits
YARDGARD 1/2 in. x 1 in. Mesh Welded Wire Fence
YARDGARD 1 in. x 2 in. Mesh Welded Wire Fence Roll, 24 in. x 25 ft.
Hutch Materials:
Other Items:
20W Solar Fan Powered Exhaust Fan
Metal Shears Drill Attachment – Really useful for cutting hardware cloth or light weight metal
